I use the mega-isp solution mentioned above - the Arduino avrisp sketch is here
http://code.google.com/p/mega-isp/downloads/list
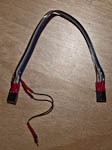
I do not use the shield they have - I made up a simple cable using two 6 pin dual-in-line header sockets to fit the programming ISP connector on your Arduino. (I did not have two dil sockets so I used standard single in line and superglued two 3 pin sockets together.
You then need a piece of ribbon cable or some wire.

Connect each pin on one socket the the corresponding one on the other, with the exception of pin 5 = Reset.
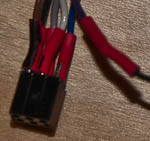
Connect one end of the cable to pin 5 - this is the end that will connect to the target AVR that you wish to program. Connect the other end of the pin 5 wire to a floating pin connector.
To use connect the cable to the arduino by placing over the ISP programming connector and connecting the floating lead to digital 10, connect the other end to the target ISP connector. You need to ensure that the pin 1's match up.
Program with avrdude using
avrdude -P com7 -p t2313 -c avrisp -b 19200 -U flash:w:fred.hex
where
com7 - the com port that the Arduino based programmer is on
t2313 - the type of AVR you wish to program (m328 for ATMega328).
fred.hex - the name of the hex file you wish to progam into the target.
I have used this to program Tiny2313 with no problems.
Note: The cable will carry 5v to power the target - if the target is already powered then do not connect pin 2 of the cable.
You are right, programming AVRs is pretty easy. It's just a custom protocol implemented on top of SPI, running at low voltage. SCK is needed.
However, programming older PICs (and non ISP AVR programming) requires high voltages and a different custom protocol. This necessitates a special hardware programmer.
Other devices are more complex. Most ARM microcontrollers must be programmed via JTAG, here memory is being written directly and the processor is instructed to write to the flash. Again, every device is different.
Best Answer
Note: This mini-tutorial is based off of the official information here on the Arduino site. It also involves using the official Arduino IDE.
Note 2: The links provided to products may be either Farnell links (as they contain data sheets) or the actual product pages on the manufacturer's website.
Step 1: Get an external programmer
The first thing to note is that you need an external programmer to avoid the bootloader and reclaim the 1K or 2K of memory which it takes up (12.5% of the total memory). You could use an AVR-ISP, a STK-500, or a parallel-port programmer - the official Arduino site has instructions for this here. Note that you can't communicate with the board through the parallel programmer - the advice is to use a serial cable for that. The main benefit of using a parallel programmer is that they're much cheaper than the others if you're willing to do some soldering - you only need a few (3) resistors and a few connectors, whereas an ISP can set you back up to £30/$50 (conversion rate is approximate).
Step 2: Edit the Arduino preferences file
Next you'll need to configure the Arduino IDE to allow you to circumvent the bootloader. Make sure you do NOT have the Arduino IDE open! The preferences file
preferences.txtcan be found at the following locations, depending on your operating system:C:\Documents and Settings\<Username>\Application Data\Arduino\preferences.txt(Windows)/Users/<Username>/Library/Arduino/preferences.txt(Mac)~/.arduino/preferences.txt(Linux)To get to the preferences file in Windows, go to the start menu and then go to
%appdata%(NB: I don't use Windows regularly, feel free to correct me). Then navigate to Arduino and then topreferences.txtOn Mac, either use Terminal, and do:
Or in Finder use Goto (Cmd-Shift-G) and enter
~/Library/Arduino. These both take you to a Finder window withpreferences.txtin.On Unix systems, folders starting with a '.' (such as
.cache,.git) are by default hidden, so in Linux you'll need to use the Terminal and enter:Note: You can replace nautilus with
gnome-openif you wish. I know that these both work on the common flavours of Linux, but you may have issues on some of the more 'exotic' flavours.Once you have found the
preferences.txtfile, open it and change theupload.usingfrombootloaderto the name of one of the programmers in the./hardware/programmers.txtsubdirectory. If you only want to remove the bootloader from one board, in./hardware/boards.txtyou can change the<board>.upload.usingparameter and all of the other boards will still use the bootloader. Then just save the relevant file and close it down (my Arduino just crashed and I almost lost the answer, possibly because I forgot to do this).Step 3: Upload the sketch
Once you've edited the relevant file, open up the Arduino IDE again and upload the sketch as normal. If you just edited
./hardware/boards.txt, then only that particular board will not have the bootloader, but if you editedpreferences.txtthen all of the boards won't have the bootloader.Step 4: Replace the bootloader
If you want to have the bootloader on your boards again (for whatever reason), then first remove either the
<board>.upload.usingparameter or setupload.usingback tobootloader. Then you'll need to burn the bootloader back on to the affected boards - this answer explains reasonably well one method of doing it, and there's an easier method to upload the Arduino bootloader only with just an ISP (which you should have from earlier) on the official site here.