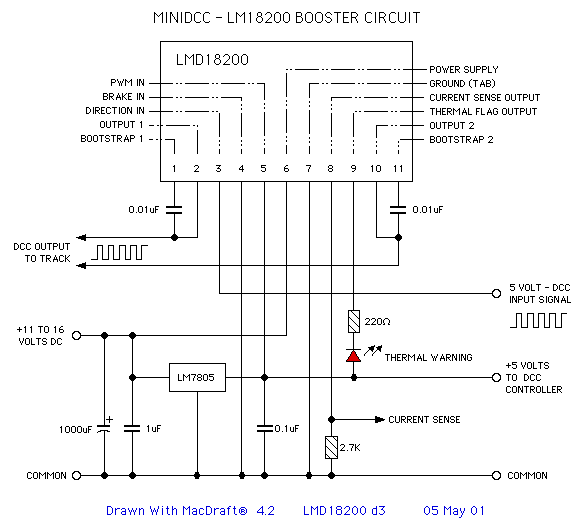
I'm building a DCC booster that at present uses one LMD18200 as per the circuit diagram. This gives me a continuous current draw of 3A, however I'd ideally like much more amperage (since I'm running a number of model trains with this at once, and it's not unusual for the older motors to draw well over 500mA under load, plus lights and smoke generators.. it adds up quickly.)
Usually I'd just look for a more powerful HBridge, but in this case I need relatively fast rise and fall times to remain within DCC spec – something I haven't been able to find elsewhere in a more powerful HBridge. The rise time with 1 LMD18200, with appropriate caps is around 100ns which is well within the DCC spec of 500ns – so it doesn't matter if this suffers a bit, as long as it doesn't get pushed beyond 500.
At present my knowledge is nothing more than some HBridges can be paired up in parallel safely and others can't because one will likely take the vast majority of the load and end up burning out anyway – so is an LMD18200 safe in this respect? Just as importantly, will the rise / fall times suffer beyond the spec? And if this feasible, what route would you recommend taking?

Best Answer
I would generally not recommend trying to parallel two of this type of bridge device in parallel. The reason being that there is no real assurance that the Rds-on of the FETs in corresponding positions of the bridge will have the same impedance. When they are not matched the load current sharing between the two paralleled devices does not balance.
There may also be some variation of the generated bootstrap voltage between the two parts and this would result in there being a slightly better drive to the upper FETs on one part versus the other. The part with better drive would be better enhanced when ON and could thus assume more current sourcing to the load than the other part.
A better solution for higher current is to find yourself a suitable H-Bridge controller chip (there are quite a few of them these days) and then build your own H-Bridge with four external FETs selected to provide the current rating that you need. Things to look for in selecting the bridge controller are:
If you want to try a hand at design using a part with on-board FETs for the H-Bridge take a look at TI's DRV8432 part. This device has two full H-Bridges on board, each capable of operating at 3A. They can be paralleled to provide for 6A capability.